Pages

Thursday, November 18, 2010

Card Tech Club Cards - Brayered Embossing Folder

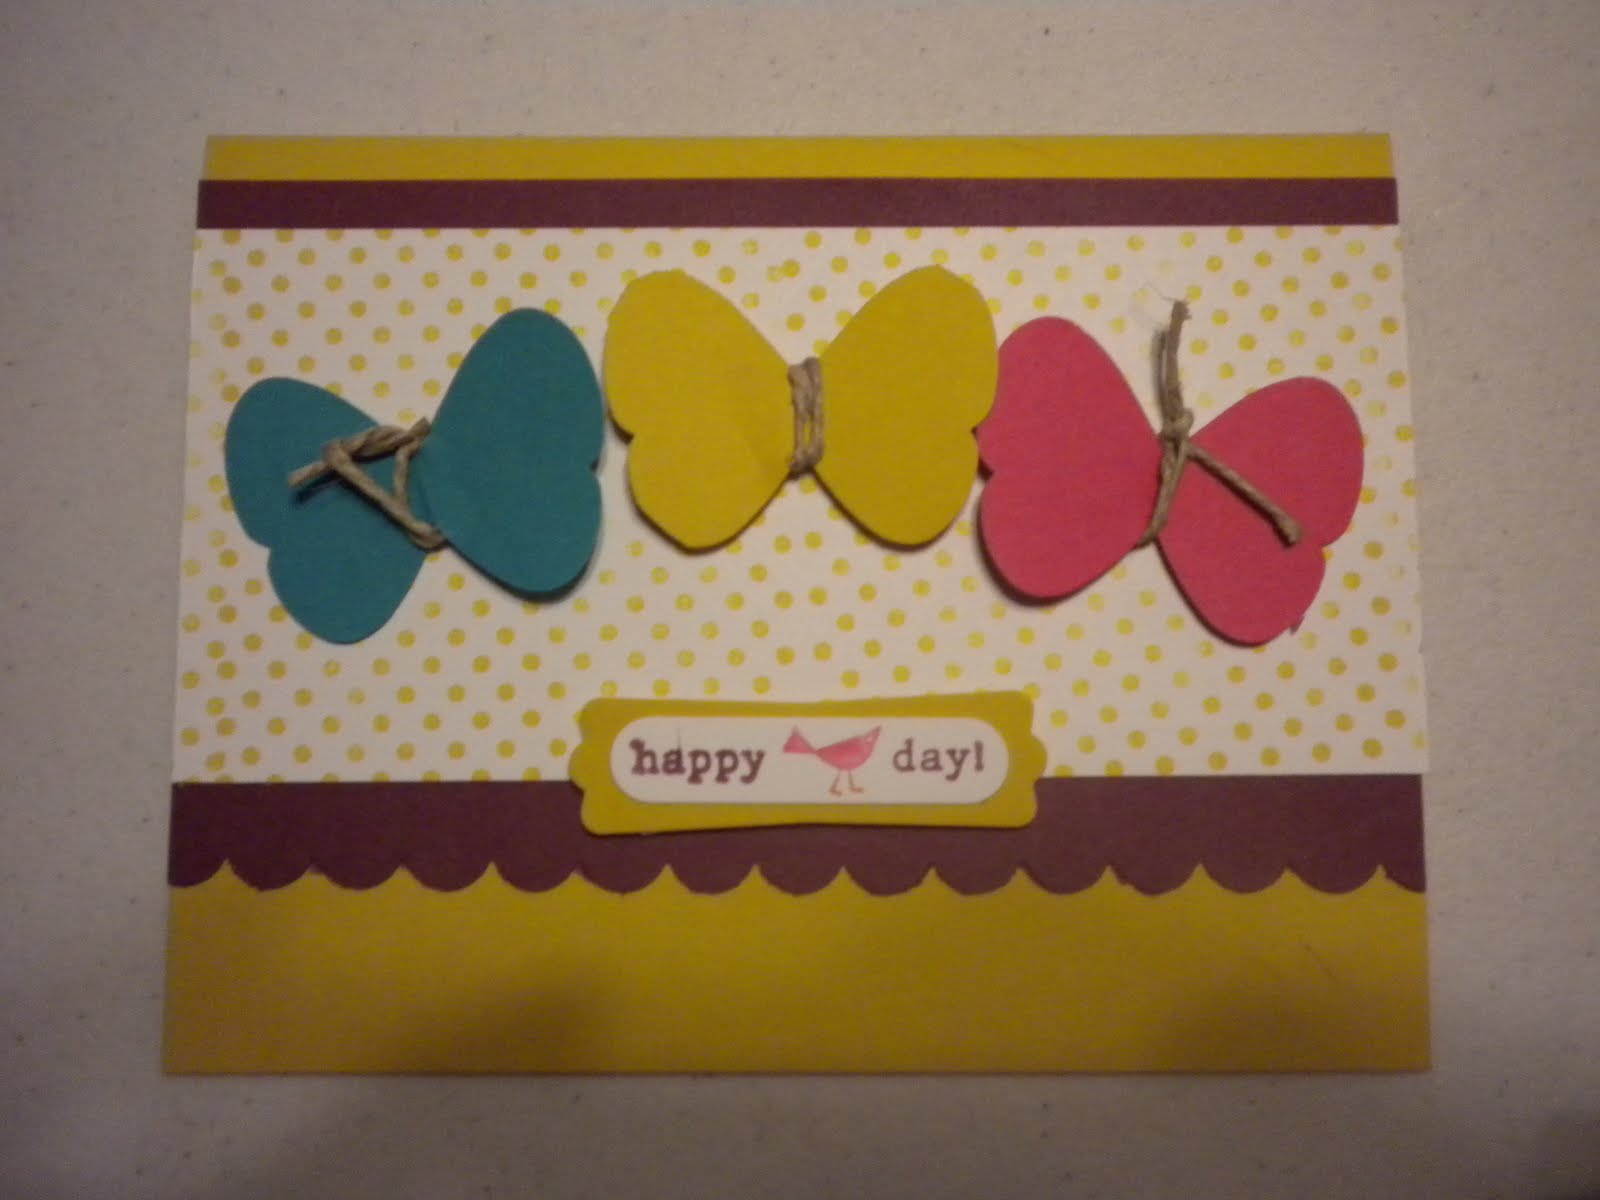
Here are the cards for tomorrow's Card Tech Hostess Club. We'll be using our rubber brayer on texture folders to the colored background on Very Vanilla and Whisper White card stock. I sincerely apologize for the crazy matting on this first card... let's just learn from this that liquid mono is not as for giving as a tape runner!


~Ashley

P.S.  I will be sure to add the card recipe's tomorrow when I'm a little less sleepy from wrapping caramels all day, so be sure to check back!

Tuesday, November 16, 2010

A Yummy Treat!

Vanilla Caramel Recipe
1 cup butter
1 cup light brown sugar
1 dash of salt
1 cup light corn syrup
1 15 oz. can sweetened condensed milk


Heavily butter bottom and sides 9x13 backing pan.  Melt butter on low.  Add in all other ingredients one at a time until each is thoroughly mixed in.  After all ingredients are added boil on medium until temp reaches 245degrees F.  The temp really does make a huge difference in the consistency and texture when the candy is cooled!  Cool in fridge for at least 1 hour before cutting.  Wrap in squares of wax paper and enjoy!

A not so yummy looking picture of the caramels in progress... about 4 hours of cooking, cooling, cutting and wrapping. 
Well worth the wait!


~Ashley

Sunday, November 14, 2010

Where did the time go?

 Oh my!  I don't know what happened, but this week just got away from me!  I haven't completed any projects in a couple of days but I certainly have mad some progress...


A new home for all of my SU! 8 1/2"x 11" cardstock!  The were in portable file holders before... so I switched all of our bills into them and gave my cardstock a better home!  Who needs bills anyways, right?!
My storage cubes all together and accessible now!

Now for the rest of the room...
Hopefully I can get that accomplished tonight and so we can get back to some happy craftin'!

~Ashley


Wednesday, November 10, 2010

For The Hubby!

Where does the time go?  I've been working on a care package to send to my wonderful, supportive hubby this week and just lost track of time!  Here the card that he'll get when he opens up his box!  I just love these screw head brad from Recollections, I've been stashing these for a year now and this was the perfect excuse to use them! 
Supplies:
SU! Totally Tool stamp set
SU! Lattice embossing folder
SU! Cardstock: Basic Black, Coffee Crumb, Whisper White & Kiwi kiss(retired)
SU! Hemp twine (from years and years ago!)
Recollections brads


Sunday, November 7, 2010

A Simple Friendship


I've been on a mission this week to finish some of my unfinished projects.  So today I have for you some cards from last years hostess club that have been trapped in a pile of clutter just waiting to be loved!

Old Olive, Rose Red, Pretty in Pink (Regal Rose accents)
So Saffron, Marina Mist & Melon Mambo
Baja Breeze, Melon Mambo & Elegant Eggplant
 Supplies:
SU! Simple Friendship #113397
SU! Scallop Circle Bigz Die #113468
SU! Circle Scissor Plus #112530
 SU! Paper Snips #103579
SU! VersaMark Pad #102283
SU! Iridescent Ice Embossing Powder #101930


Happy Crafting!
~Ashley

Snowflake Ornament Card

So I had a little free time this evening and took a stroll through the Christmas section at the store, which reminded me about my clearance finds from last year!  So when I got home I went straight up stairs to pull out my Christmas stash.  That was the easy part!  Getting to a work area however.......
 There's more to the madness, but I just couldn't bare posting pictures of all of it!

 A couple of hours and few piles later... here is my final project!


40 minute late (not really though because of daylight savings time!) ... 

I hope you enjoyed my project for the day, that definitely helped to keep my grumpies away!
~Ashley

Friday, November 5, 2010

Give Thanks

 TGIF!  Wow has it been a long week or what?!  I've been trying to dig my Thanksgiving decor out of the basement all week but I haven't even managed to get the Halloween bin back down there yet!  So until tomorrow I'll have to settle for the pictures....

 I made this banner last year during my late night crafting phase (I've since had to readjust my schedule!).  I started at about 10PM and finished up vacuuming all of the glitter remnants off of the couch sometime around 3:30AM!
Supplies:
Sturdy cereal boxes
SU! Top Note Die
Mod Podge
DCWV Fall Stack
DCWV Fall Sticker Stack
Cloud 9 Chipboard Monograms
Glue Pen
Martha Stewart Glitter

Don't forget to stop back by for a project a day!
~Ashley 

Wednesday, November 3, 2010

A Taste of Christmas - Gingerbread Magnet


So I just couldn't hold back on this yummy little guy any longer!  Can you blame me?  I love gingerbread!  I rolled a couple dozen of these little guys out on my Big Shot last year and just never managed to put them all together...  

Wouldn't these be a great project for the kiddo's to decorate as Christmas gifts?  I kept it simple and used my mono Tombow glue to adhere my Real Red scraps to the cork and then attached 2 small pieces of the magnetic tape strips (less than $1 at Walmart for enough for all 2 dozen of my gingy's!) to the top and bottom of the scrap paper to even out the weight of the magnet.  I used Stickles to highlight his mouth because my white gel pan gave out on me earlier this week.


 I hope you enjoyed this tasty little treat!  Much more gingerbread to come soon!
~Ashley

Monday, November 1, 2010

Fall flame

Oh how I love the fall!  Last month at my Gift Giver's Hostess Club we stamped on candles using the Stampin' Up! French Foliage set (item #121166) Holiday Mini Catalog and the tutorial from Splitcoast of course!


This is attempt #1!  I didn't trim the tissue paper enough... I thought that it would work out if I stamped several of the images on a square of tissue paper rather than applying 1 at a time... not so much!  I would highly recommend applying each image 1 after the other so that you can trim the tissue paper adequately, and within the flat surface of the candle!


Voila!  My finished product!


I'll be offering a make up class for a couple of ladies this Saturday at 7, if you'd like to join us just email me for details.  We will be stamping on this 3x4 pillar as well as a votive to practice on. 


All the crafty best,
Ashley 

Sunday, October 31, 2010

Right back where I belong

Happy Halloween!

Wow!  Where has the time gone?  For a while there, when the kids first went back to school I had to take a crafty hiatus:-(  I thought I was going to have all sorts of time on my hands when school started, since my youngest started preschool this year... boy was I wrong!  I seemed to have forgotten that the start of school also signals the start of outdoor soccer season; so between homework for the boys, 4 evenings of soccer between the 2 of them, 1 Saturday morning/afternoon for games, an exhausted (cranky) new preschooler, and finally my oldest son's 8th birthday party.... I had absolutely zero time & energy for my beautiful, neglected paper (or even the computer) ... which definitely led to some serious grumpies!

Anyhow... I've finally made it back to my crafty habit, right where I belong! The sparkly treat above is a picture of my daughter's freshly re-purposed shoes to go with "Rosetta" Halloween costume.  FYI - when I say "freshly" I really mean it!  I painted and glittered these little beauties just 1 hour before we were supposed to leave to go Trick or Treating this afternoon!  There's nothing a little acrylic paint, Mod Podge & glitter can't fix right?!


Don't forget... A project a day keeps the grumpies away!
~Ashley

Sunday, August 22, 2010

Etched Glass

Back to School project #2 - Etched Glass

WARNING: Etched glass is extremely addictive! Don't start this project until you are prepared to want to etched every pyrex baking dish, mirror and window in your home!

A little late, again! We're left with only 10 days until school starts and project #2 (out of 10) of my back to school countdown! This little project is brought to you courtesy of some monogramed wedding glasses that I was working on for a friend last week, this votive holder was my practice project and took 15 minutes total! This would make a great monogramed back to school gift stuffed with school supplies for your favorite teacher... not to mention cheap!
Supplies:

Armour etch
latex gloves or a foam craft brush
Clean glass object (drinking glass, votive holder, mirror, etc)
contact paper or vinyl
punch or die cutter


Friday, August 20, 2010

File Folder Notebook

Hi everyone! I hope you've all been enjoying your summer. Just 13 short days til school starts! I absolutely love school themed projects and gift ideas so I thought I'd share some of my favorite gift projects with you as we get ready to head back to school! This first project is a preview of the project for my gift givers hostess club that starts tonight.


Back to school project #1-File Folder Notebook

Supplies:
Mini legeal pad (8"x 5")
SU! Playdate File Folders
SU! Owl Punch
Bone Folder
Score Board (I used my Fiskars paper trimmer)
Red liner tape
Ribbon ( 8 to 12 in.)
Cardstock scraps


Found the tutorial at over at Splitcoast Stampers.

Happy Craftin,
Ashley

Tuesday, May 18, 2010

More tile coasters!

I love these tumbled marble tile coasters! I made 3 sets of these coasters with my Unity KOTM stamps. I can't believe how easy these are to make! 30 minutes to make a house warming gift and 2 teacher appreciation gifts last week ... that's gotta be some kind of record! Not to mention that it was less than $10... for the tiles that is (we won't count the stamps & the ink cause those are necessities... right?!)

Sunday, May 16, 2010

Tile Coasters

I had so much fun with my hostess club ladies last month at our coaster class and finally I've had a chance to download some pictures! I'm so happy that Spring has finally reached the Northwest... along with the motivation that comes with the sun!
One of my samples for class. Used SU! Stamp & Write Markers, Chalks, and blender pens to color. Baked for 20 minutes to heat set and then used 3 coats of acrylic sealer.

Dragonfly coasters & trivet made by Lori. The set was a hit at her Arts Guild auction this weekend... I think they sold for $26! Not bad at all compared to the cost of the project!
SU! Nature's Nest stamp set

Another beautiful coaster set using the Nature's Nest stamp set. Made by Michele over at the daily nusz.

The most popular coaster design by far was this background stamp from SU!... which of course I can't recall the name of at the moment! This beautiful set was made by my MIL, Tammie.

Happy Crafting!

Friday, May 14, 2010

Yellow, Green & Brown MPS Color Challenge

A quick & simple card for the yellow, green & brow color challenge today from My Pink Stamper. Trying to clean of what is supposed to be my desk (more of a storage pile these days!) and found everything that I needed in my scrap box and the pile of stuff from recent projects!

All supplies are SU! except for the green patterned paper from DCWV

Tuesday, April 27, 2010

Make the Cut!

I have to tell you... I absolutely love my Cricut! Just when I didn't think I could love it anymore... my wonderful husband bought me the Make the Cut software, which I couldn't be happier with! My first project was for him of course and I couldn't be any happier with how it turned out! We spent about 10 minutes online searching for the images that he wanted and then I spent about 5 minutes transferring the images over to make the cut and TA DA! I absolutely LOVE it!


I haven't quite figured out how to share files yet, but if you have make the cut and would like the file I'd be more than happy to share if you send me a message.

Tile Coaster Class


Just a quick little reminder....

Tile Coaster Class this Friday at my house from 1 - 3 pm. $8 for 1st set of 4 coasters, $5 each for any additional sets. 2 spots left!


Wednesday, March 31, 2010

Seattle Sounders Opening Game!

A bit delayed... pictures from the beginning our spring break! My husband and I started out our spring break at the the regular season opener for the Seattle Sounders and it was absolutely perfect!Pregame rally in Pioneer Square! Gotta love the band!

Our season ticket seats are absolutely fabulous! The view is perfect! No obnoxious people around us! The best part though... is that we are 3 rows up from being uncovered! Their was a sea of ponchos in front of us (which I did of course purchase before I knew where our seats were!) but we were perfectly dry!
I don't know if you can see it, but this picture is of my favorite part of the game... foil paper raining from above! It was a little bit of glitter heaven!

My husband and his brother.

Just the 2 of us!


More spring break posts to come later today!

TTFN
- Ashley